Linux Mint is the most popular Ubuntu based Linux distribution. Some would argue that it's even more popular than Ubuntu itself. Because of its Ubuntu base, Linux Mint shares a lot of the same great features with its parent distribution while offering a more traditional desktop design. One big feature that Linux Mint is missing though is the ability to create a Live USB stick with persistent storage. In this tutorial I'll show how to create a Linux Mint Persistent Live USB drive using UNetbootin and GParted.
What you'll need
You'll need a few things before you get started. I'll be using an installation of Linux Mint 13 to create the Live USB in this tutorial, so it will be easiest to follow along if you're running Linux Mint, Ubuntu, or something similar. While it should be possible to do this from Windows since both UNetbootin and GParted have Windows versions available, I'll only be covering how to do this from Linux. You could use a standard Linux Mint Live CD or USB as your build system if you want.
Second, you'll need the ISO image of Linux Mint. UNetbootin should be able to download it for you, but I prefer to just download it separately ahead of time. I'll be using the 32 bit version of Linux Mint 16, MATE Edition for mine, but other versions should work just as well.
Download Linux Mint 16 ISO - torrent links:
- Linux Mint 16 Cinnamon 32 Bit
- Linux Mint 16 Cinnamon 64 Bit
- Linux Mint 16 MATE 32 Bit
- Linux Mint 16 MATE 64 Bit
- Linux Mint 16 KDE 32 Bit
- Linux Mint 16 KDE 64 Bit
- Linux Mint 16 Xfce 32 Bit
- Linux Mint 16 Xfce 64 Bit
Third, you'll need to have UNetbootin installed on your Linux system. You should be able to find it in your distro's repositories. If you're running Linux Mint or Ubuntu, you should be able to install it with:
Or, just click: install UNetbootin
And finally, you'll need a USB flash drive or SD card that's at least 2 GB in size. The larger your USB stick is, the more room you'll have for persistent storage.
Preparing the flash drive
Now that we have everything we need, it's time to get started.
The first task is to create a couple of partitions on the flash drive.
WARNING: This process will erase all the data on your flash drive. Make sure any files you need are backed up.
To avoid confusion, you may want to unplug any other USB drives from your system. Now plug in the flash drive you want to use for your persistent USB stick and open up GParted. If GParted is not already installed on your system, open up a terminal window and install it with:
Select your USB drive from the device drop-down in the upper right corner.

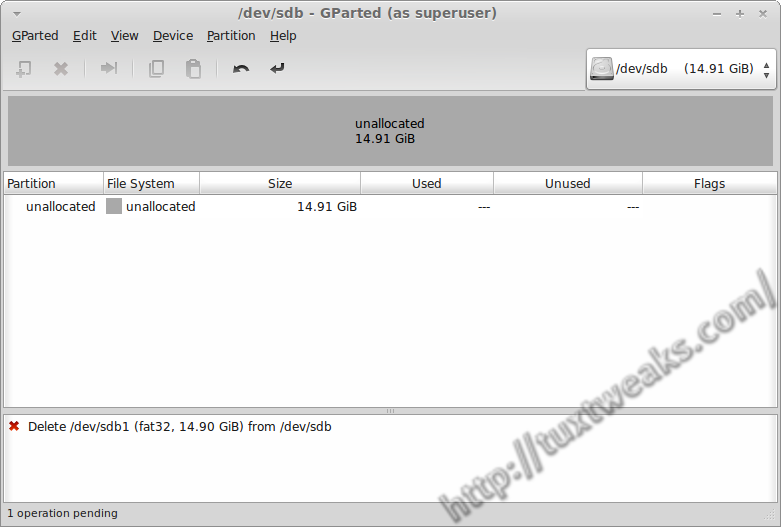
If there are any existing partitions on your drive, right click on them and select Unmount, then right click again and select Delete Partition. Your drive should now be shown with only unallocated space.
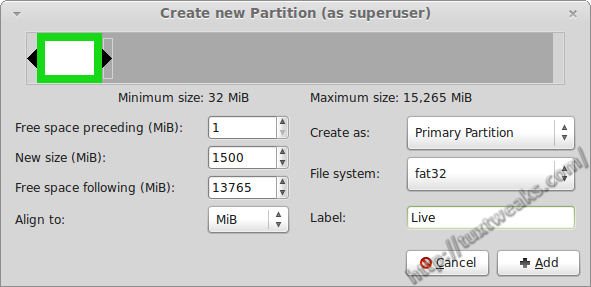
Next, right click on the unpartitioned space and select New. Set the size of the new partition to 1500 MiB, set the File system to fat32 and click Add.
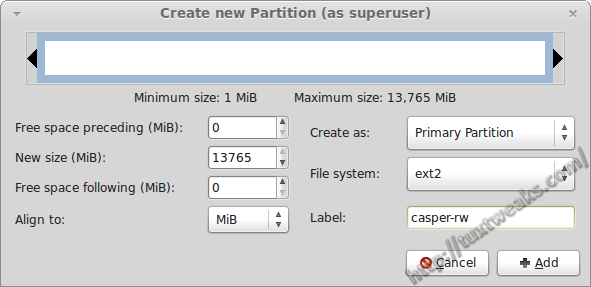
The next step is to create the persistent partition. Right click on the remaining unallocated space and select New. This time choose ext2 as the file system type and set the Label to casper-rw, then click Add.
Now you need to apply the changes to the flash drive. Go to Edit->Apply All Operations.

As long as you're sure you picked the correct drive, click Apply at the warning pop-up.
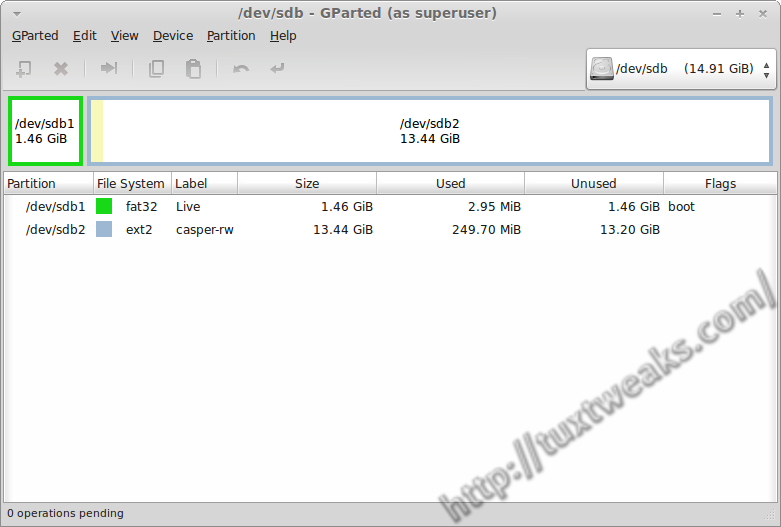
The final task in GParted is to set the boot flag on your boot partition. Right click on the first partition and select Manage Flags. Mark the box next to boot and then click Close.

Write the ISO with UNetbootin
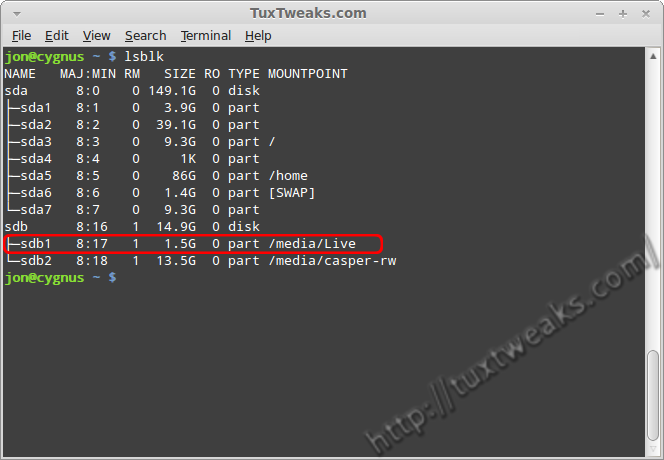
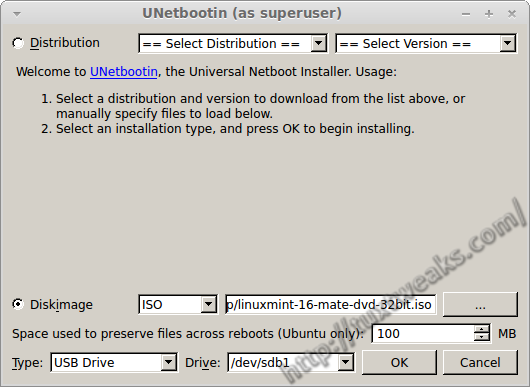
Open UNetbootin and select the radio button for Diskimage. Click the "..." button and navigate to Linux Mint ISO that you downloaded previously. Make sure that USB Drive is selected and that first partition of your USB drive is listed as the drive. If you're unsure of your drive letter assignments, use the lsblk command in a terminal to check them.
Next, enter 100 in the field labelled "Space used to preserve files across reboots (Ubuntu only):".
When you have the UNetbootin window looking like the image below, click OK to start writing the image to your USB drive.
When UNetbootin is done writing the image, DO NOT click the Reboot Now button. Hit Exit instead because we have one more change to make to the USB drive.
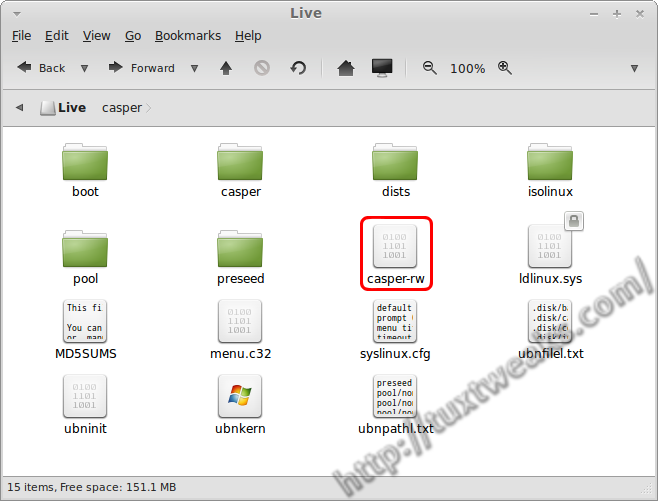
Open the boot partition of your Linux Mint Persistent Live USB drive in your file manager. Select the casper-rw file and delete it.
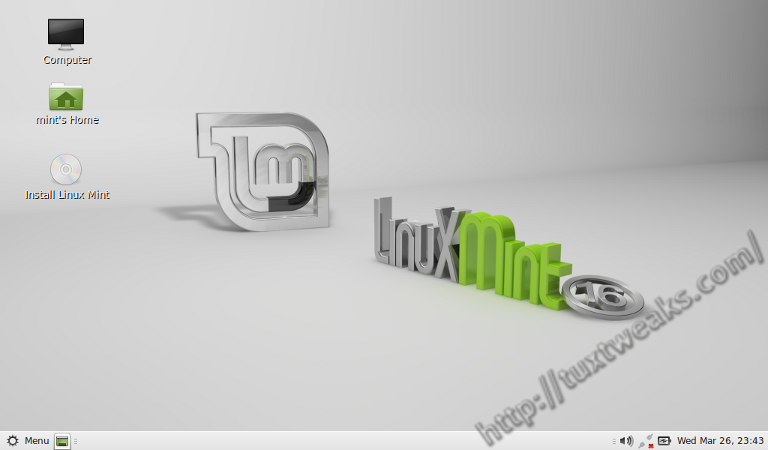
Congratulations! You now have a Linux Mint Persistent Live USB drive. You can now reboot your computer to boot into your USB drive and give it a try.
Here's a picture of my Linux Mint Persistent Live USB running on my netbook.
You can now use your bootable USB to install Linux Mint on another system, edit documents, browse the internet, or whatever you want.
Credit: This post by usbtux on the Linux Mint forums provided the basics of this tutorial.
This content was authored by Linerd and originally appeared on Tux Tweaks at https://tuxtweaks.com/2014/03/create-linux-mint-persistent-live-usb/
#
¡Muchas gracias! excelente contribución a la solución definitiva al serio problema que me ha quitado un valioso tiempo de mi vida. Su aporte detallado paso a paso de manera didactica hace que usted sea un buen hacker.
¡¡¡ T H A N K S !!!
#
Thank you for the compliment!
¡Gracias por el cumplido!
#
Hi all,
this morning I¡ve get Linuc Mint 18.3 working persistenly from the USB. It was so straight and easy in my case.
I used the method described for Ubuntu using mkusb.
Please, follow the tutorial here
https://askubuntu.com/questions/397481/how-to-make-a-persistent-live-ubuntu-usb-with-more-than-4gb/853839#853839#answer-853839
I followed the process described in the second answer.
Good luck to everybody!
#
hi,
I followed the steps described in
http://tuxtweaks.com/2014/03/create-linux-mint-persistent-live-usb/
for both linux cinnamon 18.3 and 19 (64 bit) and both processes lead to a dead end= initramfsnot
I do know how to proceed further.. it is the same story all over for many linux set-ups... you follow "advice" which leads to nothing but waste of time, frustration and aggravation.... You may argue that it was four years and things have changed......
All the best
Tassos Chryssafis
#
Exactly the same thing. I didn't work with Linux Mint 19 64-bit Cinnamon. Just waste my time...
#
Pretty sad that after all these years Linux Mint still doesn't support persistent live USBs like so many other distros...
#
Tried other options before, but this worked for me with Linux Mint 18.3 Cinnamon.
Finally able to run all updates.
Thanks !!
#
32 or 64 ?
#
Hi @Cakebaker, hi all,
I've a question about using 18.3: Did you sized sdb2 patition (label Live) with 2GB at least?
many thanks
j
#
It is far more easy than you think.
Just use UNetbootin. Add the persistence and choose the space you want to use for it.
Then, if the installation is done, open computer --> File System --> cdrom -->Boot --> Grub and edit grub.cfg. I did this in Windows with Notepad++. Otherwise in Mint the file is read only and I don't know how to edit it and save it. Tips/ Tricks?
Copy the following, change the name like you want it an add the word 'persistent' like below. That's it!
menuentry "Start Linux Mint 18.3 Cinnamon 64-bit persistent" {
set gfxpayload=keep
linux /casper/vmlinuz file=/cdrom/preseed/linuxmint.seed boot=casper iso-scan/filename=${iso_path} quiet splash -- persistent
initrd /casper/initrd.lz
}
#
Hello:
This didn't work for me with Linux Mint 18.2 Sonya on a 16 GB stick. 🙁
I followed every step to the letter, except for the first partition I allocated 1800mb instead of 1500 (18.2 ISO is 1.6 GB). Everything else I did as instructed and my live usb stick boots and runs mighty fine, but nothing I customized, installed or configured was saved after I closed the first live session.
So is it confirmed yet that this procedure won't work past 17.2?
Otherwise is back to 4 GB casper file using either http://www.linuxliveusb.com/ or https://www.pendrivelinux.com/.
Seems like a waste of usb stick space. 🙁
#
I am the author of Easy2Boot. Creating a separate partition with a volume name of casper-rw and using a boot parameter or 'persistent' works for 17.2 but not for 17.3 or 18.2.
The casper script in the initrd.lz file id coded to look for the 'persistent' parameter. There is no occurrence of 'persistence' being looked for in the script, so I guess it will just be ignored - you might as well use 'ignoreme'!
A volume name of casper-rw is looked for in the startup script.
When you get the initramfs error, if you do ls /cow/ you can see lost+found, work and upper directories in the mounted /cow/ volume.
The mount command shows it has mounted the partition as /cow.
So it seems that the partition is being used and initialised by the casper script, but then something later fails.
I can't believe that this has not been spotted and fixed by the developers??
#
https://askubuntu.com/questions/664577/unable-to-boot-ubuntu-live-usb-flash-drive-with-casper-rw-persistent-partition
fix for the casper script is described here (I haven't tested it)
#
why do you say 1500mb for the first partition? why not 1600, or 1700?
#
At the time I wrote this, 1500mb was plenty of space to unpack the boot image. You only need enough room for that. Then the rest of the space on your flash drive can be used for the casper-rw persistent partition. This is where any changes to the system or personal files will be stored.
#
In desperation have just downloaded Mint 17.2 and tried again. I can now vouch for the fact that in 17.2 'persistent' works but 'persistence' does not. Using 'persistent' it boots, I can make changes, exit, reboot and my changes are still there.
Using 'persistence' on V17.3 or V18 they will boot OK but nothing is saved, i.e. no persistence.
I don't know if it matters but I ensured that *all* instances read 'persistent' in both 'syslinux.cfg' and 'grub.cfg'. My partitions are called 'live' & 'casper-rw'.
So, the procedure works with V17.2 but using the exact same process fails to work in 17.3 or 18, at least on my hardware!
So, for sure something has changed as 'persistent' works perfectly with 17.2 but results in an 'initramfs' error with either 17.3 or 18.
#
Very frustrated after spending several hours over two days trying to recreate my damaged Persistent Mint USB stick.
I cannot make it work on Mint 18 or Mint 17.3 using either 'persistence' or 'persistent' in grub/syslinux.cfg. The only sure thing is that 'persistent' only gives an 'initramfs' error.
The really odd thing is that my old stick (Mint 17.2) would only work with 'persistent' and not 'persistence'! I know this because I saved both config files for future reference. So, has something changed?
The whole process seems very flakey with many people failing to achieve persistence and with various supposed 'fixes' being published, none of which has worked for me. Is it time to revisit this process? Sadly it is beyond my relative newbie knowledge 🙁
#
I used the MKUSB tutorial... IT DESTROYED MY USB DISK; it can only be used as storage now on my windows machine. Tried for 3 days to get this to Boot Again using various software and suggestions. WTF LINUX ! Back to windows again.
Mint XFCE 18.2 was great on a 4 GIG with persistence, However once you get down to that last gig of storage its SUPER Slow, and you have to run on a machine with enough ram so it does not Cache (3-4 GB), or use gParted to create a swap file on the machines hard disk (not an option on public computers)
Why can't we create a large GB persistent USB with a live CD ? with USB 3.0 and large capacity TIF and Micro SD, Android, and the options are enormous.
Just want to Boot into LIVE USB or Android SD; plug in my 16 GB and in install a persistant image, Thats ALL !!
#
For those who tried it with 17.3 - it's not working. What seems to work though is 17.2, from which an upgrade to 17.3 is possible. I did that and had no problems initially, however, some days later there were some small issues (freezing). I am not sure if those issues were related to the update.
I would have loved to get smaller distros like lubuntu to get to work, but after many days of trying and not succeeding, I give up. I would like to hear which other distro besides LM 17.1 , 17.2 and zorin (?) are really working.
#
I am using 17.1 KDE and want to update and upgrade and make other slight adjustments then remove the persistence from the system, will the reverse process work as well?
#
This Tutorial ...nice and good and easy for anyone, but I got some lil observation!!
Did anyone read "Space used to preserve files across reboots" (ubuntu only)..that mean some distros based on Ubuntu can o can't supported
#
cannot believe how hard it is to make a bootable linux mint USB stick, there appears to be nothing that hasn't been thought about to block, nothing works, my god, now wonder people won't leave windows, Linux doesn't work unless you're a Guru, why, why, why can't the designers make thing simple?
#
Maybe you should make sure your computer can boot to a usb stick first.
#
Try a different distro, Linux Mint seems to be hard to install, I think Ubuntu or Lubuntu is easier, Raspbian is REALLY easy to install to a flash drive, just download the .iso and burn it with etcher. automatic persistence.
#
"cannot believe how hard it is to make a bootable linux mint USB stick"
Really? And I pray how easy is it to make a bootable Windows USB stick? I am thankful that we CAN make a bootable thumbdrive with Linux on it, a complete sophisticated and modern OS in my pocket. Try doing that with Windows!
#
HI all,
I'm trying to create a live Linux Mint Mate USB onto which I can run/keep a command I found scouring the internet. It's to do with getting HDMI-out to work on a laptop to a TV. I found it here:
https://arstechnica.com/civis/viewtopic.php?p=27416165&sid=2907f2489ec598c0277bf2e6cd9b4153#p27416165
I need to be able to run the commands & make them "stick". Will creating it this way work for what I'm asking??
Thanks in advance!
#
Hi Tracy,
This tutorial *should* work for you, just make sure to read the posts from people that managed to get it working with Mate (or any 'post'-Rafaela). I have Rafaela on my thumbdrive with persistence and I've managed to install a ton of software, as well as adding a couple of repositories/ppas. Everything working perfectly so far. So if you can get persistence working, any installs/updates you do will 'stick'. Hope that helps!
#
Tested this tutorial on Aug 7th, 2016 with Linux Mint Cinnamon Edition 64 bit and Ubuntu 16.04.1 LTS:
1) Linux Mint 17.1 - The Live USB works perfectly, being perfectly persistent. This worked only on BIOS.
2) Mint 18 Sarah - "persistence" did not work. All notes below concerning the use of the word "persistence" are valid. But persistence does not work nevertheless. Tried both Legacy BIOS & UEFI. 🙁
3) Ubuntu 16.04.1 LTS - Same procedure (Live partition, casper-rw partition, deleting casper-rw file) did not work either. Use of the word "persistence" is any way necessary. Tried both LegacyBIOS & UEFI to not avail.
A "df . -h" shows that in cases 2 & 3 the casper-rw partition is not recognised. In bot cases Mint as well as Ubuntu booted w/o problems, but were unable to be "persistent"...
What changes have been made to the newer kernels?
Next test will be to "install" Mint 18 or Ubuntu 16.04.1 from a normal Live USB containing the bootable distro chosen, and then "installing" it --with very much care!-- onto another USB much larger, preferably USB 3.0 (simulating a HDD/SDD). Not tested yet.
#
the best and simple way to create a linux os on usb persistent is with linux live usb creator.download the program and enjoy!!!!!!!!!.http://www.linuxliveusb.com/
#
The tutorial works with Linux Mint 17.1 "Rafaela", but not with Linux Mint 17.3 "Rosa".
The only "tweak" applied was to change "persistent" (gives initramfs error) to "persistence".
#
correct....
press tap and re-type, u can change the line name under filesystem for uneth
#
complete path : "mount on another OS"
/syslinux.cfg
swith "DEFAULT LINE"
from "persistent" to "persistence"
#
I was just trying to make a persistent drive from a 64GB usb stick, and followed the instructions as well as this tip and some others to try to get it to work, but, despite booting fine, it is still not persistent and does not keep files between boots.
#
I've tried this tutorial and suggestions in the comments for editing grub.cfg and syslinux.cfg, but there's no persistence in Linux Mint 17.3 KDE "Rosa". Indeed if "persistent" is written in the files mention above, the (initramfs) error occurs, if it's written "persistence" the error doesn't occur anymore. However there's persistence with the casper-rw file, but that's limited to 4GB.
#
Hello,
I tried the above procedure for the latest Linux Mint 17.3 MATE - 64Bit Edition. I boot through UEFI disabling secure boot and it boots successfully. However I'm not able to make persistence work. The only change that I did from the above process is my casper-rw partition is ext4 and not ext2. Will that be a problem? Also is it required to set the boot partition label as 'Live'
#
HI I need help with this as well. I encountered the (initramfs) boot error issue, but managed to get past it by adding the word "persistence" after the "--" in the "syslinux.cfg" and "grub.cfg" files. I confirmed the word "persistent" causes the (initramfs) boot error issue in my case.
My problem now is that I can boot successfully, but persistence is still not working yet. Any ideas? I confirmed on two separate sandisk flash drives with 16GB and 64GB capacity. Same behavior on both when I edit the files mentioned above.
#
i followed these directions but with mint 17.3. When i boot i get into
(initramfs)
Could not find the ISO ${iso_path}
Any ideas what this is about?
#
The same happened to me with mint 17.3! Initramfs appears and I have no ideas what to do next.
Anyone?
#
Hello guys,
I went through the same problem and spent lot of times looking for a fix.
However i figured it out myself and it was just so easy than i expected.
So in my case i had just to swtich from Legacy boot to UEFI boot ( with disabled SecureBoot though ) and it just worked perfectly .
Tested with Linux Mint 17.3
Hope it helps someones there!
Cheers
#
I've used unetbootin and the above tutorial to make a few sticks now as I get to know more about linux and design a few front-ends for different purposes i.e. design, programming.
I've noticed that the above method works for Mint, Ubuntu and a few other systems such as Porteus. However, when I've tried to use it for Debian and Kali, it just doesn't seem to work even though the casper-rw file is still replaceable. Do you know why this is and whether there is any way around it?
I'd like to be able to run a suse server from larger stick sticks with cloud networking for a web app project me and some freinds want to start but anticipate the same problem. Any advice please.
Ive also noticed that Slax supports persistent booting without the casper-rw - what is the difference between that and the unetbootin persistent stick - I'm guessing its that Slax doesnt need ext 2 to write to but as I'm a noob I cant be sure.
#
What worked for me on the Debian based distro is naming the partition persistence and modifying the live.cfg file in syslinux/ directory with the word persistence instead of persistent. Here is the relevant section from live.cfg:
label live-amd64
menu label ^Live (amd64)
menu default
linux /live/vmlinuz
initrd /live/initrd.img
append boot=live components quiet splash persistence
I also installed this from a Debian Jessie box and had to copy libcom32.c32, libutil.c32, vesamenu.c32 and ldlinux.c32 from my Jessie box's /usr/lib/syslinux/modules/bios/ folder to the thumb drive's syslinux/ folder to successfully boot Debian Jessie as a persistent USB.
I'm having problems getting persistence to work currently on a Mint 17.3 Cinnamon install doing it manually. I've created the casper-rw partition and added persistent in syslinux.cfg after the boot=casper and get dropped into an initramfs shell every time I reboot and select the persistent option. If I exit out of the shell I get a kernel panic. dmesg doesn't report anything interesting. I can boot in the other modes without the word persistent in the config file(/syslinux/syslinuc.cfg as seen mounted from a Linux Desktop).
The BackBox live persistent USB I created recently uses casper-rw partition and persistent keyword in the .cfg file. There the syslinux.cfg file already had a persistent option and menu items defined. I had to install the 4 files from my Jessie desktop because I did the steps manually and the command syslinux -i /dev/sdX only copies 2 of the 6 files that were necessary for all 3 USB drives to boot successfully. At no point did I try using Unetbootin as I've had mixed success over the years and didn't feel it is necessary.
The lesson here regarding persistence is that the persistence configuration on casper/non-casper based systems doesn't appear to be consistent with each Distro using the same boot parameter ; persistent vs. persistence, as well as the config menu located in /boot/grub/grub.cfg or syslinux/syslinux.cfg, etc. Another file that is created on the ones that I've installed recently mention adding the single line "/ union" to a file with various names on the persistent partition. One uses live-persistence.conf (Debian) another used persistence.conf.
#
Thanks for a great tutorial, my usb persistent drives work perfect. I have just one question. As you can probably imagine, sometimes it would be desirable to be able to run my pendrive through windows, for example if i'm in the local library or an internet cafe where I cant access the boot menu of the terminal I'm on. Is there a standalone app that I could place on the stich which would allow me to do this. Such a thing would be worth its weight in gold for the utility it would grant a user.
Thanks in advance.
#
Not that I know of.
#
Hi,
I would recommend you the "http://www.easy2boot.com/" solution - works great for me.
#
Thanks for an excellent tutorial. I have created a Zorin-OS persistent usb drive on my 16gb hp usb drive.
#
Nice to know it works for Zorin. Thanks for letting me know.
#
There seems to be a difference in the boot commands from UEFI and legacy GRUB modes in UNetbootin installations. The former not including the "persistent" keyword. Add that some way, either manually at boot time (tested, it worked) or by editing GRUB configurations or use the legacy loader. Do you agree with this?
#
Just wanted to thank you for the excellent tutorial! I wanted to set up a 64GB stick with Mint 17.2 with persistence so I could install a bunch of dev tools and retain my settings, and the info here worked. Here's how my process went:
I started with GParted running on a live dvd of AV linux (I have a stack of CDs/DVDs with different distros on them). For some reason, that version of GParted wasn't completing the partitioning process properly. So I tried the GParted on Kali (which was a different version), and it worked perfectly. Then I used Unetbootin to put it on the stick. I believe that one poster was correct in that the second partition must be named "casper-rw" - I tried the casper-snapshot method, but it didn't work for me. I basically followed this tutorial to the letter, except I used those tips about editing "syslinux.cfg" and "grub.cfg", adding "persistent" after the "--" on each line. It's painfully slow (mainly boot time, a full 5 minutes!), but it's worth it because now I have an awesome system that's portable. I think I might use a smaller stick with Mint on it that's NOT persistent, just for sketching out ideas and saving docs etc to my local drive, and using the persistent one for my full dev environment. Anyway, thank you for the tutorial, and thanks to the other posters for their great tips! UPDATE - I just read TimT's Aug 25 post; my 64GB stick is Staples' brand, so that's possibly why my boot time is so slow. I'll have to look into a better stick and do this again.
#
I love your tutorial! It is simple and works great! I have discovered a few things not covered, probably because of when you wrote it compared to what is happening today (August 2015). I'd like to share my discoveries in case they are useful.
1. The type and quality of the USB stick used is very important. Some generic USB sticks are really slow (i.e. Microcenter generic brand is cheap, but slow) so while some are great for storage, they aren't so good for a bootable Linux Mint distro. I have found that Kingston DataTraveler 16Gb or 32 GB USB 2.0 (on an older computer that only takes USB 2.0) is adequate, but a SanDisk 32GB Cruzer CZ36 USB 2.0 is faster. Ironically, it is cheaper than the Kingston at Amazon, as of this date. I also tried a Lexar 64GB USB 3.0 (supposed to be compatible with 2.0) but while it was fine for storing data, after three formats and three tries, I could not get it to boot Linux Mint. I assume a hardware issue (?)
2. As you must have figured out by now, Linux Mint "Rafaela" 17.2 ISO is 1.7 GB. So, the live partition size - which you have as 1500 - won't work. I've seen some suggestions as high as 5GB, but I think that is over compensating. I set my value to 2000 and it formatted and booted just great. When I ran "disks" on the drive, it reported that only 76% of the space was used, leaving plenty of room for expansion. I have since installed a bunch of additional software (such as Audacity) with no problems at all.
3. If anyone wants to use WINE, they may be surprised to find that Windows programs which worked well in XP and WIn 7 work better in WINE! I have several programs running under WINE and they've never done so well!
Anyway, thanks for the GREAT tutorial!
#
Thank you, that was very helpful!
#
Newbie. Thanks for the instructions they did the trick. Still, I could use some feedback though: 1)I was using a 32 GB flash drive so I split the partitions first: 15000 MB second: what was left over. Did I do right or should I redo with some other space allocations? and 2) When I boot off the flash drive everything seems to run extremely slow. Is there a fix? Did I do something wrong? My desktop computer has 4 GB ram (sorry, cant remember the speed only that it is dual core and probably over 2.7). I like Linux Mint 17.2 but if the speed can't be improved I will probably just go back to lxpup. Still, your instructions were clear and easy to follow, thank you.
#
Hi Calre,
The type of USB drive will seriously affect the speed of the Bootable Linux Install. It's a "hit or miss" kind of thing. I have found that Kingston DataTraveler 16Gb or 32 GB USB 2.0 (on an older computer that only takes USB 2.0) is adequate, but a SanDisk 32GB Cruzer CZ36 USB 2.0 is faster. You can find them (32GB) on Amazon for pretty cheap.
Hope this helps.
#
Worked great as described with Linux Mint 17.2 32-bit. Also, used LesStrater comments about editing the syslinux.cfg to get rid the unetbootin menus and Jacob's idea about adding a 3rd partiition.
Thanks guys.
#
@gvelim
Sadly , your method does not work.
I get the feeling that at *1. type "sudo casper-snapshot" there may be some command parameters missing, as I get nothing from *3. Run "mount" and notice that snapshot is saved......
There is nothing at at "/mnt/casper-snapshot" and no "casper-sn.cpio.gz" file
@Linerd
Why the hell are you advising 1.5GBfor the Live partition. The bl@#$y ISOitself is 1.5GB! everyone, as I did will get the out-of-space error and then need to do it all again, with say 4GB.
Also ... the procedure does not create a writeable Live USB drive, as others have found
@ the creaters of UNetbootin for Linux.
Please add the Option/function to create Session Writeable Live drives.
I know its freeware but this whole experience has wasted days of my precious live and still failed.
This is why I F*&^ing Hate Linux. It just consumes time and you end up giving up and going back to windows.
FFS!
@
#
At the time this was written, the largest Mint ISO was 1.3G: http://mirrors.advancedhosters.com/linuxmint/isos/stable/16/
Rather than being nasty, why don't you try being a little more cordial to people that offer free tutorials and free software? You might find them a little more willing to help you if you're being nice.
I highly doubt the UNetbootin devs are following this post, so your suggestion will likely never reach them through this blog.
In my opinion this hack with UNetbootin shouldn't be necessary. If the Mint devs did things right, their Live USB creator would support persistence like the Ubuntu one does. If you want an easy to create persistent Live USB, try Ubuntu.
#
I use Mint 17.2 with grub2 boot loader on the HDD. What is your Linux, bootloader setup ?
I have also been successful doing the same setup using http://www.linuxliveusb.com/ instead of unetbootin.
#
I have successfully managed to make a live USB stick with Mint 17.2 that loads on memory and is super fast, saves all changes at shutdown and loads them back on the next boot up.
To do this you need to do the following steps
1. complete all steps as above using unetbootin
2. when (1) completes then ensure you rename ext2 partition (keep it ext2) to "casper-sn" (not casper-rw)
3. delete the casper-rw file from root
4. Open the grub.cfg file under /boot folder and after the "--" insert "showmounts persistent"
5. boot from the USB stick for the first time
now after you let it boot open a terminal window and
1. type "sudo casper-snapshot"
2. this should run with no issues and return
3. Run "mount" and notice that snapshot is saved at "/mnt/casper-snapshot" which contains casper-sn.cpio.gz file
4. Run "sudo cp /mnt/casper-snapshot/casper-sn.cpio.gz /media/mint/casper-sn"
5. run "sudo reboot" and boot back to the stick
You should now be able to see Mint loading and executing in memory as if you had no persistent enabled. Make changes to the environment, upgrade few files and then reboot.
You should see the shutdown taking time because casper saves the memory snapshot on the USB stick / casper-ln partition
Enjoy your super fast perstistent USB stick !!
#
Cool! Thanks for the tip. I'll have to try it out.
#
Thank you Linerd for this brilliant tutorial!
Thank you gvelim for your most helpful comment!
However, it did not work for me (Mint 17.2) during my first attempts - I tried this and that, but what fixed it in the end was to name the persistent partition "casper-rw" and not "casper-sn".
In spite of gvelim's expectation that casper-snapshot sould run without issue, I got the error message that "/cow" was not existing; this was of course easily fixed by "sudo mkdir /cow"
Thanks again, guys - excellent job!
#
Finally, a solution that worked. Thank you.
#
I found this article yesterday, as a new user of Linux wanting such persistence for Mint 17.1 (Cinnamon). I was dealing with a fresh Mint ISO downloaded from a USA server in Mint developers list, and a new SanDisk Ultra 32.0GB USB...ran into several problems re low space or failure to create as expected like some others in this post's comments.
What worked for me was changing the value of the first GParted new partition from 1.5GB (1500MB) to 5.0GB (5000MB), and otherwise following all directions as published. The live USB install then showed a file system free space of about 27GB; and hovering my cursor over "casper" got message casper-rw was already part of file system; the USB install then accepted OS updates, a few extra app installs/updates, with free space slowly going down to a final 22.0GB after adding my choices/cleaning up...and everything persists as if I were on any OS' traditional HDD install.
Thanks very much indeed for the original article, hope my input adds a good option to try for others having trouble.
#
Dan, thanks for your comment. I'll have to experiment to see what's going on with LM 17.
#
I tried this today with an 80GB external USB HDD. I followed the directions as they are except for using a 5GB first partition (just because I didn't want to run into problems). Everything is working fine.
Thanks for this.
#
no step to tell the USB to use the casper-rw partition? just simply making the partition and labeling it does the job?? it just knows to place persistence there?
#
Yep. 🙂
#
I receive a out of space message
Is it rrealy the 1st partiton ( 1500 Mb) we chooe in Unetbootin ? or the larger one ?
JF
Newbie
#
Yes, you want to choose your smaller partition. What value did you enter for the "Space used to preserve files across reboots (Ubuntu only):"? You want to enter a small amount there because it will eat up space in the first partition. That sets the size of the casper-rw file that you are going to delete in the following step.
#
When I start the installation with unetbootin on the 1500 MB partion as suggested, I receive a out of space message along the road
I will try to choose the large partition (not the 1st one as suggested ) to see if it work
JF (Newbie)
#
thank you for a wonderful tutorial. I am in the process of completely getting rid of windows on my home laptop (currently a dual boot with mint xfce 17 and win xp).
I have a different question. what I want to do is to replicate my existing linux on to a usb with persistence so that I can carry it with me and use it on any other machine which does not have a linux installed.
As i understand with your tutorial one can install a 'new' system on usb and then also update it as needed. What is the way to get all your installed applications across? Or am I barking up the wrong tree.
I am more or less a newbie but have been using linux off and on and now for the last six months regularly.
thanks
mytor
thank you
#
Thanks for this great tutorial!
I used it to make a UBUNTU UNITY USB stick with about 12 GB persistence after the 4GB of the OS was looaded in. Works just fine.
I also did it to make a Linux Mint MATE distro on another USB stick. Mint MATE took more room so I only had 11GB free space on that one. But they both work just fine. I am sending you this from my MATE stick.
There was something nuts about my USB sticks though, so I had to go into DISKs and wipe out each stick before I could use Gparted for the free space. Not sure why - they were nice Kingston USB sticks.
Anyway, your tut works great. Thanks!
#
I've tried with Mint 17.1 and it only works if I do not delete the casper-rw file as suggested by this tutorial. What I dont't get still, is how to install apt packages on the stick.
#
Thank you very much. That's exactly what I was looking for!
#
Hello Linerd, I have a running linux mint 10 live usb (actual download via unetbootin). How to modify to a persistent Live Stick ?
#
Hi All!
I have a major question. Am I doing something wrong leaping steps to run a perfect Rebecca? I'm running Rebecca 17.1 perfectly on a 8gig flash drive with over 2.5 gigs devoted for docs and videos without having to've tooled around with Casper or Persistence or anything. I created a iso CD to the letter then used gParted to format the whole flash with only one partition and no swap anything then used the Rebecca's install program and that was it. A Mint flash drive that acts just like a Hard Drive, though a little slower granted, but it works as natural HD as can be. No memory or Casper alerts or anything. Yet I constantly see Linux blogs putting newbies through the torture of creating partitions and persistence and the whole nine years when its my experience that it's not even necessary. Or did I do something wrong to get to a perfect drive?
Jim in NYC
#
Hi Jim
I am a true newbie to Linux and liked your comments on one partition running on an 8 gig flash drive. But as a true newbie, can you provide a more step by step on this? I am having trouble trying to run the instructions above in the tutorial (getting errors, not finding items, etc) and don't know how to resolve. I am thinking that perhaps with a step by step on your method, I might have more success.
thanks
Mike
#
Would I be better off running from a 64 GB USB 3.0 flash drive or a hard disk?
#
I think the flash drive would offer better performance between the 2.
#
Thanks a lot! I'm setting up a server to backup all the computers in my house (probably with Amanda), and this tutorial looks like just what I need. It's my first dance with Linux.
#
thank you - this is the clearest guide i've seen on this matter. i was struggling to understand how persistence works before i saw this.
#
When I was trying to create the second partition, as soon as I clicked on "New", I got an error saying "it is not possible to create more than 1 primary partition". Also, on the only partition I was let create, I only had the choice to set it as the "primary partition" - Extended partition was greyed out.
I solved it by clicking on "Device" >> "Create Partition Table". Now Extended partition isn't greyed out and I have no issues trying to create the partitions.
Thanks a lot for this tutorial!
#
Thanks for sharing your solution.
#
Thanks. I had same problem and your advice helped.
#
Hmmm.... when I follow this tutorial and I reboot both my Windows 7 and Linux Mint 16 machines with the new USB inserted, nothing happens.
#
You might need to check your bios settings, specifically the boot order. There should also be a button you can press during startup that will show you all your boot devices and you can choose from them. If you still have issues, try out plop boot manager. Its a cd boot loader that forces the recognition of usb drives. very handy for stubborn computers or obscure usb drives.
#
Great tutorial! I was able to create a live USB flash drive with very little difficulty.
One problem: I get "low disk space" warning after 2 - 5 minutes of use. Any ideas?
Thanks.
#
Mint 17 warns me of low disk space whenever my home directory has less than 1 GB available. This is on a hard drive install. Not sure how to stop it...
#
Hi,
I've just solved a problem with making my Mint 17 amd64 MATE persistent.
I followed every instruction mentioned in this tutorial, but for some reason, my Live USB kept booting without persistence.
After browsing many many postings about persistence problems I decided to take a look at the two config files that initiate the persistence during boot:
- syslinux.cfg (/ folder if you access the USB using another running Linux distro OR /cdrom folder if you access from your Live USB)
- grub.cfg (/boot/grub if you access the USB using another running Linux distro OR /cdrom/boot/grub folder if you access from your Live USB
I noticed two things:
1) In the file syslinux.cfg the word "persistent" was placed at the very end of every boot options command line, after the "- -".
In every posting about persistence problems, the instructions are to place the word "persistent" right after "boot=casper", so I did.
Nothing really changed after this; I still had no persistence. I did notice though, that there were far more boot options in syslinux.cfg than I saw when booting my Live USB. So that inspired me to look at the grub.cfg, where I found my 3 boot options.
2) in the file grub.cfg there was no "persistent" at all in the boot option command lines. So I added "persistent" right after "boot=casper" in every command line and rebooted...
Voila! Persistence was finally there!
I'm still a bit of a newbie, so I'm not sure what I did wrong in the first place. Is there an error in the latest version of Unetbootin?
Or perhaps the Live USB isn't supposed to boot using GRUB?
Mine does, and changing the grub.cfg (and syslinux.cfg, though I'm not sure whether that changed much) solved my problem.
NOTE: while following the steps in the tutorial when installing Unetbootin, I did get a warning that a certain module was missing, and that I should install syslinux to be able to use Unetbootin to install onto ext2 partition, but since I was installing to a fat32 partition, I ignored that warning. Unetbootin was still working without it.
Perhaps that sparked Unetbootin to set the boot handler to GRUB?
NOTE: I had to use another Linux distro to be able to change the syslinux.cfg and grub.cfg files. You cannot do that from the Live USB, because the files are 'read only', even when opened as superuser (because the system thinks they're on a CD, which is read-only by definition)
#
Thanks for sharing your solution.
#
I was able to get the process to work however I noticed a significant slowdown in system speed when using a usb key set for persistent mode vs one that was not. Are there some additional parameters that can be adjusted?
Thanks for the fantastic tutorial.
#
I noticed a big difference in performance too, but that's the price to pay for persistency. Especially browsing is very slow.
One tweak that really helps speeding up your web browser: turn of the caching to disk. Web browsers send a lot of cache files to disk and Casper keeps storing these, while you don't really need these files.
Here's the tweak for Firefox:
- in the addres field type "about:config" and confirm that you'll be careful.
Find the following parameters and turn them all to 'false' (by doubleclicking on them):
- browser.cache.disk.enable
- browser.cache.disk_cache_ssl
- browser.cache.offline.enable
- Close your browser and restart it.
You now have a non-caching browser. It should be a lot faster.
There are some downsides:
- some Java-scripts cause errors, because they need caching (just continue and tick the 'remember this' box)
- speed now fully depends on your internet connection, which may be slower when opening frequently used pages
Good luck!
#
Thanks for the speed tips.
#
Just to clarify, for newbies like me: the persistent partition MUST be named "casper-rw", as the tutorial states.
If it's named anything else, the changes and settings *won't* persist.
Thus, this comment (below) from March 31, 2014 is not true: "...I believe that one could name the persistent partition anything in addition to the "casper-rw" suggested in the article..." -- That mistaken advice threw me for a loop for a couple hours, before I corrected the naming.
Otherwise, this works perfectly with Mint 17. I also liked LesStrater's syslinux.cfg edits to get rid of the Unetbootin menu (comment: Aug 20 2014 ). Though the default Unetbootin menu can be handy for a rescue disk or troubleshooting, it was mighty annoying for my use, which was to send a customized, ready-to-go Live Mint USB to a non-tech friend, that she could install on her old computer.
#
Thanks for the tutorial!
I am quite new to this, and chose this option as my HDD stopped working when I tried to install Mint, so I removed it with the intention of replacing it eventually. For now I wanted to run Mint from USB with the option to download things like skype and to save some downloads.
So, Everything is running, but extreeeemly slow and I cant seem to download skype through package manager. Would it help (with speed and downloads) if I made the iso partition bigger? I have 60Gb to play with.
#
Bump! Having the same problem.
#
To the ones that are getting stuck at 6x%.
Wait for it. It happened to me (67%) but it resumed after a while. I guess it's just a big file and it seems like it has stopped when it has not.
Thanks for the guide!
#
My UNetbootin keeps hanging at 64% during step 2 of the process. Any suggestions?
#
Hi, you're tutorial worked great for me until I tried UNetbootin. UNetbootin keeps on "hanging"/gets "stuck" at around 65% during step 2. Is there any way to fix this? I have tried UNetbootin with Ubuntu and the same problem occurs at a different percentage. Please help ! Thanks.
#
Very helpful, thank you. This worked like a champ and I'm betting it would be fantastic with USB 3. As-is, it is usable, but slow. I'm not willing to run without updates and the first full update ate up over 2 GB of data space, but my experience is that this shouldn't grow that much more. (I built this for a friend whose on-board HDD controller went bad. He should be able to get another year or two on that old laptop just running from a thumb drive.)
I'm betting USB 3 and systems with more memory will open up some very interesting possibilities in persistent Linux. What I'd really like to see is a major distro that loads as much as possible into memory at all times (like Puppy) in order to minimize reads/writes to storage. That way it would be possible to just install to a thumb drive and not mess around with all the work-arounds in Live / Persistent Linux configurations. I could carry my "personal computer" around with me on my key chain (encrypted of course).
#
Thank you for this excellent tutorial! I followed it to the letter and it worked perfectly. I have a couple comments that may help others in the future.
I didn't have a Linux system to use, so I download a live version of GParted. After burning the iso file to a CD, I booted up on it and followed the above instructions. I started with a clean format on an 8GB flash drive, so before I could hit "New" for the first time, I had to "Create Partition Table" in the "Device" menu.
I set the Fat32 partition at 2500 MiB to allow allow a bit more space for the OS in case of updates, addons, etc. And finally, when finished with everything above, I browsed the flash drive in Windows Explorer and opened syslinux.cfg with Notepad. I deleted everything, then added the following:
default live
label live
say Loading Linux Mint 17 Cinnamon 64 bit
kernel /casper/vmlinuz
append initrd=/casper/initrd.lz file=/cdrom/preseed/linuxmint.seed boot=casper quiet splash noprompt -- persistent
The above gets rid of that uglyass UNetbootin menu and starts the Linux Mint OS right away. (I recommend renaming the original syslinux.cfg file to something like syslinux.old before saving the new version.)
#
Thanks for your comment. I'll have to try your syslinux.cfg trick.
#
I don't know but it doesn't work with me.
I tried installing linux mint debian edition cinnamon, but it just boots without persistence.Now I'm going to try with regular linux mint and how it goes...
#
Ok with regular mint, not with debian edition it works.
Now I'm gonna try and set an encrypted persistent space, let's see how it goes
#
Linerd, thanks for the tutorial.
I would like to add 1 important suggestion: Adding a 3rd partition for data. I've noticed that casper-rw partition is readable/writeable ONLY from the thumb drive OS; so you can't copy any data between computers. The 3rd partition (I've created fat32) allows for both, the thumb drive OS and any other OS running on other computers, to read/write.
Now you can copy your data/settings from a desktop PC and carry with you; AND for protection, you can encrypt the data partition.
#
Looking at casper-rw from Xubuntu booted on my desktop the only thing preventing me from reading and writing to the desktop from the Mint thumbdrive it is that it is owned by root. This means one has to use a tool such as gnome-commander started as root to access the files and then after copying them you need to change the ownership or ther permissions so your local user can access them.
gnome-commander makes this pretty simple: "Start Gnome Commander as Root" is an option at the bottom of the File Menu at the left side of the menu bar and "Change Owner/Group" and "Change Permissions" are the first two choices under File.
You can also use command line tools to do this but gnome-commander is so much less confusing.
#
I think it's important to make the persistent partition ext2. The ext2 file system is not a journaling file system, while ext3 and ext4 are. Journaling continually writes to the USB flash pen drive and will cause it to wear out sooner. The down side to not using a journaling file system is that error recovery is slower and the file system is more likely to become irrecoverably corrupted.
#
I tested the above approach and it works very well in my experience so far.
The advantages I can see are that the persistence space is not limited by Unetbootin limits, the persistence size can be modified as needed by a Gparted resizing of the partitions, the entire USB stick space can be used, the persistence space is separately readable/writable by just mounting the USB partition on a computer running Linux.
I read somewhere that journaling file systems should not be used with USB sticks, so EXT2 would be the preferred option for the persistence space.
#
Yeah, I used ext3 journaling file system on my 16GB data traveller. It's slowing to glacial pace, I think it's about had it! I want to use this approach on my 750GB external drive with a large FAT32 partiton for storage. I've tried a few times with another method that hasn't been booting.
#
Did it work? I've been reading this page and thinking I want to try it on a USB HDD
#
I've had good luck with 64 bit Mint Mate versions 15 & 16 in creating and using a persistent live usb drive created by UNetbootin. However, no matter what I specify, or how big the usb drive is, the space available is silently limited to 2GB. Which is ok with me because I have not been able to figure out how to create live usb that is encrypted. Without encryption, I would not want to carry around most of my data on the drive.
Thanks for showing how to use gparted to create the data partition. Maybe I can figure out how to encrypt the data partition in conjuction with the live usb. That would not be as good as having the whole lot encrypted, but it would be pretty close.
#
Is there any reason why you coose ext2? Why not ext3 or ext4?
#
No particular reason. I assume ext3 and ext4 will work just as well.
#
I believe that one could name the persistent partition anything in addition to the "casper-rw" suggested in the article. For the media created using this article, I created "TH-Mnt16Sys" and "TH-Mnt16Dat."
I tend to label my removable media "XX-name" where 'XX' is one of TH (thumb drive), SD (SD media), CF (compact flash media), EX (external drive) and so on. I have not mastered the scripting needed to use a fixed mount point for my removables and this is the next best thing. Remember, that FAT32 volume names which are 8.3 names or 11 characters.
One can alter partition labels using 'gparted' or 'dosfslabel' or 'mlabel' or 'ntfslabel.' However, I've had trouble getting win-dose to honor labels written by linux tools.
#
Is there some performance improvement from creating a partition and deleting the casper-rw file as you've done? I'm using a Persistent Live USB with Mint 16 XFCE writing this: runs very quick on a low-powered netbook. The default Unetbootin installation is much simpler: no partioning and maintain the casper-rw as the "persistence".
I've installed and updated and configured the heck out of third party software on a 16gb drive. The only thing I do NOT do on Live USB is update the operating system.
Mint is a good choice since it seems increasingly developed for use on Live USB: it used to be these installations would just go wonky after a couple of weeks (and still do on other distros.) Mint 15 and 16 keep on ticking.
#
There's no performance improvement that I know of. My experience in the past has been that using the default UNetbootin process resulted in a Live USB that wasn't actually persistent. The forum post I linked to was for Mint 14 and I know I had the same problem with Mint 15 64 bit. To be honest, I have not tried the default persistent process with Mint 16.
One advantage I can think of is that I could re-image the live partition with a newer version of Mint while keeping my personal files intact on the persistent partition. It may take a little file cleanup on the casper-rw partition though, depending on what you've updated or installed on the live system.
#
Thanks. I've had very good expeience with default Unetbootin persistence on 32 bit (older machines) on recent Mint versions, noting that I don't try to update the OS or any really large third party software like LibreOffice or GIMP and limit updates to one or two apps at a time. USB 2 is just too slow to handle really big updates reliably.
I should have said I also run Mint 16 on dual booted laptop and netbook hard drives, but I find a Persistent Live USB is a fantastic way to test out all the intriguing tips, tricks, and various software suggestions for Mint BEFORE risking my hard drive installations. Users who want the performance of a hard drive install should still keep a Live USB around as a Guinea Pig for all those brilliant experiments that might not work.