Why Install LAMP on Ubuntu?
Why should you install LAMP on Ubuntu? When working on web development, I prefer to work within the privacy of my own development environment located on my computer. I'd rather make the majority of my mistakes where no one else can see them rather than out in the wild of the Internet. In order to have that private development environment, I install a LAMP configuration. If you're not familiar with LAMP, it stands for Linux, Apache, MySQL, php (and/or Perl). LAMP is one of the most common web hosting platforms on the Internet, so it's a great environment to build and test your website.
Follow these step by step instructions to install and configure LAMP on Ubuntu 12.04-Precise Pangolin. This process has also been tested and works on Linux Mint 13, 14, and 15, Ubuntu 12.10-Quantal Quetzal and Ubuntu 13.04 Raring Ringtail. If you have a reasonably fast broadband connection, you should be done in less than half an hour.
Install LAMP on Ubuntu
The developers at Ubuntu have made it really easy to install and configure the packages for LAMP with a single terminal command. So open up a terminal window and let's get started.
Yes, you read that right. Don't leave out the caret (^) at the end. The command won't work without it. It's magical!
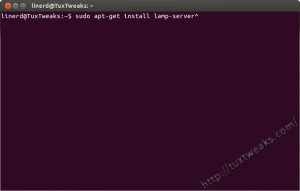
The apt package manager will now show the packages to be installed and ask for confirmation. Hit <Enter> to confirm and continue with the install.
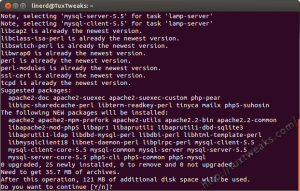
After some time downloading packages, you will be prompted to set a password for the root user for MySQL.
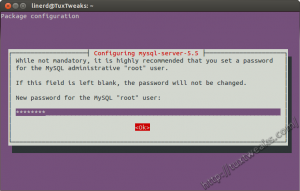
Enter the password you want to use for MySQL. Do not leave it blank. You'll be prompted a second time to confirm your password.
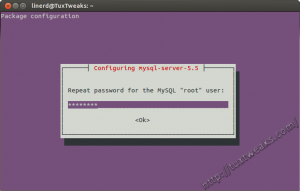
After confirming your password, apt will continue installing the remaining packages.
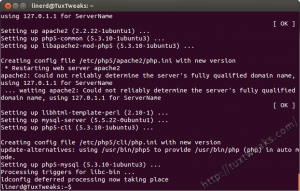
Your LAMP installation is now complete. Wow, that was easy! Now there's just a few more steps to get things configured to make it easy to work with your system.
Test Apache
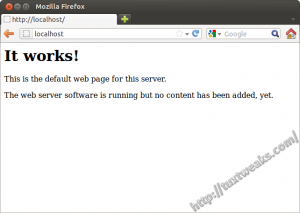
Open a web browser window and enter the address http://localhost/. You should see a web page that says "It Works!"
Test php
Now that you've confirmed that the Apache web server works, you want to make sure that your php installation is working. To do that you need to create a file in /var/www called testing.php. You can use your favorite text editor as root, or you can use the following terminal command:
After that you need to restart the Apache web server.
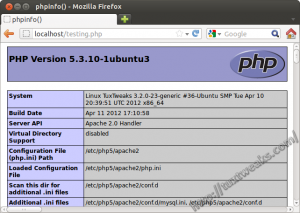
Go back to your web browser and enter the address http://localhost/testing.php/ and you should see a page displaying information about your php installation.
Fix Apache fully qualified domain name
You may have noticed an error message from Apache about the server's fully qualified domain name.
apache2: Could not reliably determine the server's fully qualified domain name, using 127.0.1.1 for ServerName
This is not a big deal, but if it bothers you, you can fix it with the following commands.
Now reload the Apache web server.
You should no longer see the error message.
Configure MySQL
Since this tutorial is for setting up a local web development environment, the MySQL needs to be bound to the localhost IP address. By default this should be 127.0.0.1 on your system. Just in case, you can verify it with these commands.
You should see something like
127.0.0.1 localhost

::1     ip6-localhost ip6-loopback
You now want to verify that you have the correct bind address in MySQL's my.cnf file.
You should see:
bind-address = 127.0.0.1
If the bind address doesn't match the one set for localhost on your system, you'll need to edit /etc/mysql/my.cnf as root to correct it.
Install phpMyAdmin
You don't need to install phpMyAdmin, but unless you're a wizard with SQL, you'll want it to do administrative tasks on your MySQL databases.
You can install phpMyAdmin with this terminal command:
You'll be prompted to confirm that you want to install the packages. Hit <Enter> to continue.
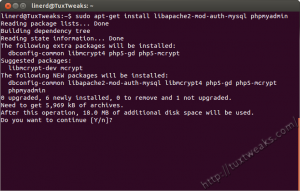
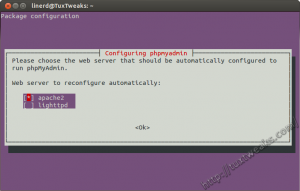
You'll next be prompted to select a web server to configure with phpMyAdmin. This is important! Use the arrow keys on your keyboard to highlight apache2 and then used the space bar to select it. Make sure there is a * next to apache2. Then hit <Enter> to continue. Make sure to click the picture below to see it in full size to see what I'm describing.
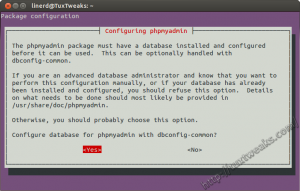
The next screen will ask if you want to configure phpMyAdmin with a database called dbconfig-common. Select "Yes" and hit <Enter>.
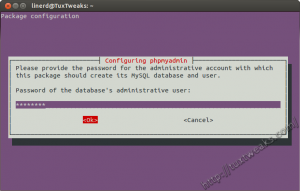
You'll next be prompted to enter the MySQL root password you created earlier so that the new database can be created. So enter your MySQL root password and hit <Enter>.
The next prompt is to create a MySQL application password for phpMyAdmin. You can hit <Enter> if you want a random password to be created. I usually use the same password that I used for the MySQL root password. It's probably not the greatest idea in terms of security, but since this is for a closed development environment, it's probably low risk.
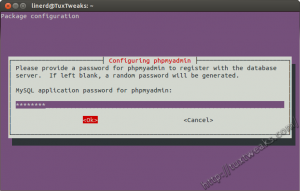
Finally, you'll be prompted to confirm your MySQL application password. Type the same password as the previous step and hit <Enter>.
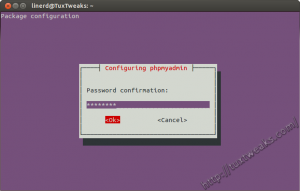
Installing and configuring phpMyAdmin is now complete.
Testing phpMyAdmin
The last step is to make sure that phpMyAdmin is working. Open a web browser and enter the address http://localhost/phpmyadmin/. You should see a page that looks like this.
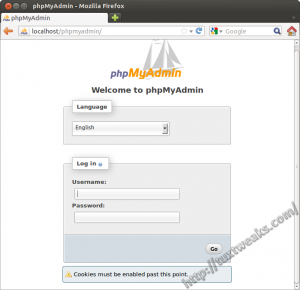
You should now be able to log in with the username root and the root password that you created earlier.
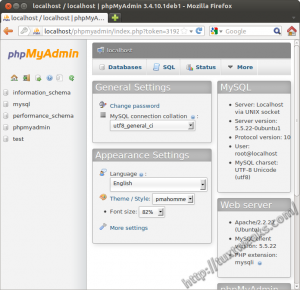
Congratulations, you are now done installing and configuring LAMP and phpMyAdmin on Ubuntu 12.04. You can now start building the local version of your website. If you are only working on one site, you can place your files in /var/www. Note that /var/www is owned by the user and group root, so you will either need to copy files over as root, or change the ownership and/or permissions of that directory so you can write your files there. As an alternative, you can do some additional Apache configuration so that you can keep your files somewhere under your home directory. You can even set up multiple sites that way.
If you've run into some problems, check out Fixing Common Problems with LAMP on Ubuntu. If things seem horribly broken and you want to start fresh, try Uninstalling LAMP from Ubuntu.
#
PHP testing results in a 404
#
I bookmarked this page YEARS ago and have referred to it many times. The instructions have held up well over the years and across a number of distros and releases of both Ubuntu and related others.
Installing most recently on Mint 17.3 and 18, the package libapache2-mod-auth-mysql is neither available nor necessary.
#
Thank you so much. it work great.
#
Started on Ubuntu around 2 years ago and tried different versions, after a long time on Windows. Learned how to do various tasks in terminal and also practiced installing various other applications.
This was however really new until l found your excellent tutorial and using the step by step guide which l found really easy.
So thanks and will look at returning and adding more into my Ubuntu 14.04.
Regards Ian
#
great tutorial, thanks a lot!
Followed it a couple of times without any problems on older ubuntu versions.
This time, using 14.04 in order to...
...fix the fully qualified domain name problem i had to
echo "ServerName localhost" | sudo tee /etc/apache2/conf-available/fqdn.conf
sudo a2enconf fqdn
instead of
echo "ServerName localhost" | sudo tee /etc/apache2/conf.d/fqdn
why? Because they
http://askubuntu.com/questions/256013/could-not-reliably-determine-the-servers-fully-qualified-domain-name
say so.
... get php tested i had to put testing.php in /var/www/html/testing.php,not in /var/www/testing.php
#
Thanks for the information.
#
"Use the arrow keys on your keyboard to highlight apache2 and then used the space bar to select it."
I think you'd better put the "space bar" in bold since many people seem to have missed it.. You explained it on your "fix" page but better they do it right away than trying to fix it later 😀
Great tutorial. Kudos.
#
Thanks for the suggestion. Made the update.
#
Hello, this post is quite old, didn't think you would reply.. hehe.
I have a problem with the installation. I could not test with this command:
echo "" | sudo tee /var/www/testing.php
And for the Apache fully qualified domain name problem, I could not solve it with:
echo "ServerName localhost" | sudo tee /etc/apache2/conf.d/fqdn
Thanks for the help!
#
When i try this echo "ServerName localhost" | sudo tee /etc/apache2/conf.d/fqdn
it says
tee: /etc/apache2/conf.d/fqdn: No such file or directory
ServerName localhost
#
Awesome job and detailed.... I am trying to setup webcalendar . I copied the folder webcalendar into the "html" folder and I can run install/index.php from the browser; however, I get the message " The file permissions of the includes directory are set so that the installer does not have permission to create a new file. Please change the permissions of the following directory to continue.:
/var/www/html/WebCalendar/includes
Can someone direct me on how to resolve this? thanks
#
The base folder for Apache is owned by the root user, you can change the permissions of the web server folders and your installer should work. Alternately, you can configure Apache to work with a folder under your user ID and that should work for you as well.
#
installed under mint 17 and working
#
Thanks for the confirmation on Mint 17.
#
had also to add the the phpmyadmin entry
Include /etc/phpmyadmin/apache.conf
in
/etc/apache2/apache2.conf
under linut mint 17 (ubuntu) then it worked!!
#
Thank you!
#
Nope... Couldn't find package lamp-server. you fail.
~Lucid Lynx
#
Read the tutorial again. The command is NOT
The correct command is
Sorry, you fail...
#
Greate article. thank you so much. before i installed XAMPP but i just remove it and go step by step on this post. thank man again
#
For me it worked up to this command:
$ sudo apt-get install libapache2-mod-auth-mysql phpmyadmin
[outuput supressed]
Package libapache2-mod-auth-mysql is not available, but is referred to by other package
This might mean that package is missing, is outdated or is available only from another source
E: Package 'libapache2-mod-auth-mysql' does not have a candidate for installation
(Since my installation is in Portuguese, I had to translate the above text back to English. This means
the wording might not be the same one you would see under an original English installation. Nevertheless,
the meaning is similar enough).
In a nutshell, I cannot finish the configuration because I can't find the fingered package.
Any hints, please?
- fernando
#
Did you try running
Then try running the command to install phpmyadmin.
Are you using Ubuntu 12.04 or another version?
#
Hi
followed your easy setup but a few questions.
1.
Is there an upgrade path? Currently php version running is 5.3.x?
2.
Is there a way to remove/delete this task, lamp-server?
Thanks.
#
The php version installed should be the latest one that's available in the repositories. As that gets updated, you should get the updates with your regular system updates.
I have written a tutorial to remove LAMP. Make sure to do the dry run first to make sure that no packages you need will be removed. I've had some comments that certain developer packages get removed. Also, if you're running Kubuntu you'll have to reinstall the kubuntu-desktop package.
http://tuxtweaks.com/2010/10/remove-lamp-in-ubuntu/
#
Fantastic! Awesome! over the past decade ... off and on I tinker with various distros.. lots of them.. for me it has been really big headache installing LAMP on linux -- following these steps is like surfing the waves under sunny summer evening.. already finished 6 installations with happy smiles...
#
Phew! Thanks! I kept getting stuck at phpmyadmin because right at that point we were getting a flash flood warning, so I wasn't really concentrating and kept getting the black and white screen without login info.
I had to reset the mysql password,
https://help.ubuntu.com/community/MysqlPasswordReset
uninstalled phpmyadmin, then reinstalled it, and REALLY READ the instructions on selecting the Apache2 server, and now everything seems to be working. Thank you for your fabulous instructions. I've spent a week with command line stuff, and it's really quite fun.
#
Most useful article. Thank You very much.
#
Nice tutorial, I've done this the hard way many times before. I have a couple of suggestions:
1.) Don't use your root password for phpmyadmin for security reasons, have it generate the random one. You don't need to know it, it's used by the program.
2.) After installing phpmyadmin, I have a habit of editing the configuration file in /etc/phpmyadmin/apache.conf and changing the /phpmyadmin alias to something less common like /webdata6, that helps to keep bad guys from discovering that phpmyadmin is in use just in case an exploit becomes available.
3.) In general, restarting apache shouldn't be necessary when creating and testing php. If it doesn't work, then restart.
Great tutorial, thanks.
#
Bill, thanks for your tips. I've never been too concerned about security since I've only used this LAMP setup for development on my local machine, but I also know that some people have used this for their VPS setup, so these are definitely some good security tips. As for the Apache restart, it seems like every other version needs it so I keep it in the tutorial to keep it foolproof.
#
This walkthrough is awesome. Thank you so much.
#
I echo comments by Rich..... OUTSTANDING LAMPP GUIDE. Follow carefully and click on the images provided for clarification.
The only thing I would like to see in this tutorial is the command to change ownership of the web root folder.
I followed this tutorial and it worked a treat in Linux Mint 15
#
I placed the following file (test.php) in /var/www after installing LAMP through the procedures given above.
the http://localhost is working but why the http://localhost/test.php is not showing any output. It is just blank, no error. Am I missing something here ?
PHP Testing
<?php
echo “If this works, we really did it!”;
?>
#
Did you restart Apache?
#
Yes I did. The installation is ok and the samples given in the installation procedure is working. But why a simple
different example is not working? When one line php program like this is working, why
not the one with echo? I am really puzzled, if someone can help me?.. I use Linux Mint 14. Thanks.
Marsup
#
I'm far from being a php expert. Did you try your program without the italics tags? If the tests in the tutorial worked, then maybe there is a syntax error in your program. Like I said, I'm no php expert. It's just a shot in the dark.
I understand that there are some significant differences between php4 and php5. Maybe the version installed doesn't support the formatting tags?
#
When I restart Apache with the sudo service apache2 restart command no error and no display
to my above simple .php file. Now, when I stopped sudo service apache2 stop, it definitely giving error like
Unable to connect Firefox can't establish a connection to the server at site1.
(Same behavious with google chrome: could not connect to ..)
What is missing in the code above?
-Masup
#
Apache2 is your web server, so when you stop it, of course it's no longer serving web pages. Just start it up again with
#
Sorry, I have intervene again for the third time today, as I was deliberate to get it. First thanks to Linerd for
giving the suggestion to restart apache2. But other thing is that i copied and pasted the " character, from a
.pdf text book. That was the culprit, and when I did on my key board, all is fine.
Thanks again. I come back again as I move forward. very kind of you all.
-Marsup
#
Thanks for letting us know what solved your problem. Thanks also for visiting my site.
#
Flawless...Thanks a lot
#
I have a problem
#
Perfect tutorial. You are best.
#
Thank's a lot!!!
great job........
It's very helpfull.
#
Many thanks! You are the best!
#
This worked perfectly for me 🙂 Thanks so much.
#
Not sure if my case was an isolated case, but I needed to manually add the line "Include /etc/phpmyadmin/apache.conf" in the /etc/apache2/apache2.conf (as per https://help.ubuntu.com/community/ApacheMySQLPHP) in order to get the myPhpAdmin running
#
thanks! did the trick
#
Had the same issue, thanks for the fix
#
Very nice! Thank you. Works great!
#
Outstanding, simple, easy to follow instructions that just works. Thanks! It looks like a number of people have had the same problem I did with the phpMyAdmin installation. I thought apache 2 was selected because it had a red mark, but this just meant the cursor was positioned there to allow it to be selected. I think this could be avoided with a small addition to the instructions. Just say that if an asterisk ("*") does not appear within the apache2 selection, it has not been properly selected.
#
This happened to me - to fix this I had to purge the install:
sudo apt-get purge libapache2-mod-auth-mysql phpmyadmin
#
i have install lamp but how can i use php code.i insert php code in html but its not showing,what can i do,please tell me
#
Create a PHP file instead of HTML. You can put HTML in it and the PHP extension instructs the server to process the PHP code in your file. Hope that helps!
#
Thanks for this post, Can anyone tell me how can i make permission for var/www folder, so that i can easily create and edit any file of www folder?
#
The folder is owned by a user/group called www-data. Adding your user ID to that group should give you permission to create and edit files there.
#
thanks....
#
The next screen will ask if you want to configure phpMyAdmin with a database called dbconfig-common. Select "Yes" and hit .
Following instructions on another website, I selected "No". Thereafter, I discovered the phpmyadmin not available. Please what can I do?
#
Try
and you should get the opportunity to say yes this time.
Take a look at http://tuxtweaks.com/2012/05/fixing-common-problems-with-lamp-on-ubuntu/ for screenshots and full instructions.
#
Thanks man. It worked alright. I owe you one. 🙂
#
I tried the above method, but when I test my "localhost/testing.php" the shown window does not appear, instead the "testing.php" file gets saved in my Downloads folder.
Any ideas how can I fix this?
#
Make sure to restart apache:
You may need to restart your web browser as well.
#
Great! Thanks so much. Took me all of ten minutes to set up my local sites thanks to your fine directions,,,
#
Hi every one,
I'm using ubuntu 12.04, and i'.m trying to save .php files on the root folder i.e., file:///var/www/
But, when i'm going to save my file it's shows the following errors., i.e., it doesn't saves my file.
What can I do?
The errors are.,,
Could not save file hi.php
Error opening file '/var/www/hi.php': Permission denied
File disappeared from disk
File name: file:///var/www/hi.php
#
Thanks,it worked very well!
#
Awesomeness, thx so much!
#
thank you very much. it was a very well written and smooth tutorial. thank you again.
#
Getting this message:
p@laptop:~$ sudo apt-get install tasksel
E: Could not get lock /var/lib/dpkg/lock - open (11: Resource temporarily unavailable)
E: Unable to lock the administration directory (/var/lib/dpkg/), is another process using it?
p@laptop:~$
How can I install tasksel?
#
Thanks for clear description,
I completely followed the above instructions, but i can't open phpmyadmin. When i'm trying to open, it says 404 error. How could i get phpmyadmin
#
Check out this page. It should get it working for you.
http://tuxtweaks.com/2012/05/fixing-common-problems-with-lamp-on-ubuntu/
#
Hi Linerd,
Thanks for your response. But still my problem is alive. I can run http://localhost/testing.php but not PHPMYADMIN at localhost., when i'm trting this command
echo "ServerName localhost" | sudo tee /etc/apache2/conf.d/fqdn
It says,
tee: apache2/conf.d/fqdn No such file directory
What can i do?
If it is a simple problem,then I'm Sorry to ask, Because I'm fresher for UBANTU 12.04
#
Finally I got it by using
sudo dpkg-reconfigure -plow phpmyadmin
sudo ln -s /etc/phpmyadmin/apache.conf /etc/apache2/conf.d/phpmyadmin.conf
sudo /etc/init.d/apache2 reload
#
Thanks!!! Your comment saved my time 🙂
#
This is exactly what i was searching. Really a precise method to configure LAMP (Linux, Apache, Mysql, Php) on ubuntu 12.04
#
Hello,
How do change the location of my Sites folder, I keep getting permission errors; I was following a tutorial on another site. I must be misunderstanding something; when Change the DocumentRoot and Directory to point to the new location I get permission errors in my web browser.
Instead of the default site location /var/www/ I want my Sites folder to be /home/accountname/Sites/
#
This post may provide what you're looking for:
http://tuxtweaks.com/2009/07/how-to-configure-apache-linux/
#
Thanks for such clear directions
#
This is exactly what I was looking for. I just hope it works. Thank you for covering that this is used for a local environment!
#
everything works fine until i try to test phpadmin. it says not found on this server
any ideas?
#
Take a look at this post: http://tuxtweaks.com/2012/05/fixing-common-problems-with-lamp-on-ubuntu/
It should help you get things straightened out.
#
The best article ever, thank you so much!
#
thank you 😀
#
Thanks for the very clear directions. So, if I were setting up a Linux/MySQL/PHP server for a public site, how would these directions differ? It seems like the applications and installs would be the same, but perhaps some steps or best practices would be different?
Forgive the dumb question. I'm relatively new to Ubuntu and I'd love to hear any suggestions for setting up and tuning a production box.
#
In command line there is such error (...-desktop:~$ sudo apt-get install lamp-server^):
Reading package lists... Done
Building dependency tree
Reading state information... Done
E: Unable to locate package lamp-server^
E: Couldn't find task 'lamp-server'
E: Couldn't find any package by regex 'lamp-server^'
Please, help me to start installing
#
Is tasksel installed on your system? Try
You don't need the "^" in this version of the command. If tasksel is not installed, install it with
then try again.
#
no, it didn't help/
The problem was solved when I selected all repositories' checks at Software Ubuntu Center (Edit->Software Sources)
#
Thanks for letting us know the solution.
#
So simply explained (both, page one and two) 😀 thanks a lot this is what i needed
#
By far the best walk-through hands down. And Fast. Thanks again.
#
Thanks a ton and god bless all of us for sharing and caring.
#
very very gooooooooooooooooood
tnx you for your post
it is very help me
#
Awesome, thank you again.
#
Hi again, do you see any issues installing WordPress after this?
#
WordPress runs pretty well on this setup. The only issue I've had was that automatic updates weren't working, but I think that's been resolved.
I've got an older post about installing it, but it's not the latest version. http://tuxtweaks.com/2009/11/how-to-install-wordpress-on-ubuntu-part-1/
#
It works!! I hit enter with a block in the apache2 selection, and not a star. Anyway thanks very much!!
#
Glad you got it working. Enjoy 🙂
#
OK so I used Chrome instead of Firefox and testing php worked. I got the php information screen above. but, I installed phpMyAdmin and when I type http://localhost/phpmyadmin/ as the url i get. I am positive I did it correctly.
Not Found
The requested URL /phpmyadmin/ was not found on this server.
Apache/2.2.22 (Ubuntu) Server at localhost Port 80
#
<?php phpinfo(); ?>
#
hmm, that should have read:
In the file testing.php it's supposed to read "", correct?
#
I followed to the letter and got this in the web page while testing php:
Not Found
The requested URL /testing.php/ was not found on this server.
Apache/2.2.22 (Ubuntu) Server at localhost Port 80
Can someone help?
#
Try restarting Apache.
You might also need to clear your browser cache to make it display properly.
#
Thanks for responding, I did a apache2 restart and it came back with 'OK'. Cleaned the browser cache. Still got the same response as above. In the file testing.php it's supposed to read correct? And should I be making the php file exe? I didn't. Thanks.
#
Thanks,
Good tutoriel. It worked find for me
#
Thank you sooooo much!!!
Iv'e used a couple different methods and this one is by far the best! If you could make a tut for setting up multi-sites with their own docRoots that would be Awesome.... 🙂
Anthony
#
Thank you so much!
I almost lost my job and your tutorial saved me. God bless your soul :D!
James
#
You're very welcome. That's the best comment I've gotten to date!
#
Hi, Great tutorial. I recently reinstalled phpMyAdmin on Ubuntu 12.04 and came across an issue with the configuration with Apache. I’ve written a post about it http://blog.peterfisher.me.uk/2012/06/27/solution-to-phpmyadmin-throwing-a-404-error/ basically the phpMyAdmin conf file was not inside the Apache configuration folder as the site was throwing 404 errors so I needed to symlink the phpMyAdmin conf to the the Apache config folder.
#
Yeah, phpMyAdmin will throw a 404 error if you forget to mark apache2 during installation. You can fix it easily by following this process: http://tuxtweaks.com/2012/05/fixing-common-problems-with-lamp-on-ubuntu/
There's no need to manually create a symlink.
#
Thanks!
excellent
#
Hi...
Grt work.. How to use phpadmin in this..
#
Good tutorial. Works for me 100%. Thanks
#
Excellent Tutorial.
How to set access permission for my website folder?
"Forbidden
You don't have permission to access /ddusa/ on this server."
#
excellent post. thank you
#
WOW! That's work on my Computer...Thanks a lot..
#
The content was really useful and clearly explained.Thank you ....
#
This is very excellent LAMP installing process. I think it is more user friendly process than ever, everybody will install it easily by having little command in English and about command line. I again thank the developers for contributing in this respect.
#
Thanks for this post. Just so that others may benefit, the installation did not put phpmyadmin. I had to do this separately.
#
Installation of phpMyAdmin is covered on page 2 of this post.
#
Thanks Aloat
#
This worked great - thanks.
#
Thanks very much! The exact steps installations on the newly installed ubuntu 12.04. Thank you!
#
great tutorial. i think you forgot to include installing phpmyadmin
sudo apt-get install phpmyadmin
so you'll not get phpmyadmin 404 error.
#
phpMyAdmin installation is shown on page two of this post: http://tuxtweaks.com/2012/04/installing-lamp-on-ubuntu-12-04-precise-pangolin/2/
#
Really very nice............
#
Good work here!!!
#
I found your site by accident after following another lamp install wicki, that caused endless problems. Your un-install link worked great. I did not want to try and un-install loads of seperate files (not clever enough !)
If I now have a lamp server, could you do a tutorial on how to get my web page on to it ?
All the how too? assume we all know how to do it I am a learner and am not sure what to do next.
Your tutorial was very clear just what is needed,thank you.
#
If you'd like to make a website using WordPress, you can follow my tutorial. http://tuxtweaks.com/2009/11/how-to-install-wordpress-on-ubuntu-part-1/
#
Thank you so much for the work, clear and objective, I would give a little help to improve this tutorial.
For those who could not access phpmyadmin after installation, as I researched a simple solution in a forum here in Brazil:
macquley: "you must create a symbolic link to /var/www by default because phpmyadmin is installed in usr/share/ follows the command:
sudo ln-s /usr/share/phpmyadmin /var/www/phpmyadmin
, now in just access your browser http://localhost/phpmyadmin"
link references: http://www.vivaolinux.com.br/topico/MySQL/Problemas-na-instalacao-do-PHPMyAdmin
I hope this helps.
#
You can also easily fix the phpMyAdmin 404 error by following this process: http://tuxtweaks.com/2012/05/fixing-common-problems-with-lamp-on-ubuntu/
#
I love you!
#
Great tutorial! Thank you so much! I love it.
One little thing: The link under 'Apache Configuration' isn't working anymore.
#
very grateful because since long time I've been trying to resolve this problem that appeared when I upgrade to Ubuntu 12.04. Before this aplication was working well.
Thanks again.
Francisco Pérez
Programador
#
Thank you
I like your way of creating tutorials.
Very Helpful
#
Why restarting Apache after creating the testing.php file???
#
As to the real why, I don't know. I just know I've needed to do that since Ubuntu 9.04 and honestly, I haven't tried not restarting Apache at this step. Maybe I'll try it tonight and see if it's still required. Thanks for your comment/question.
#
Excellent question! There was no need at all to restart Apache. I've updated the tutorial. Thanks again for your question. 🙂
#
Just added the Apache restart back to my post as some people were having problems with php files without the restart.
#
Interesting one!!!
Helpful for me !!
Thanks 🙂
#
Very many thanks for this. Most useful.
Best wishes
Peter Jones
Crawley, West Sussex
UK
#
thank you so much!. Excelent!